

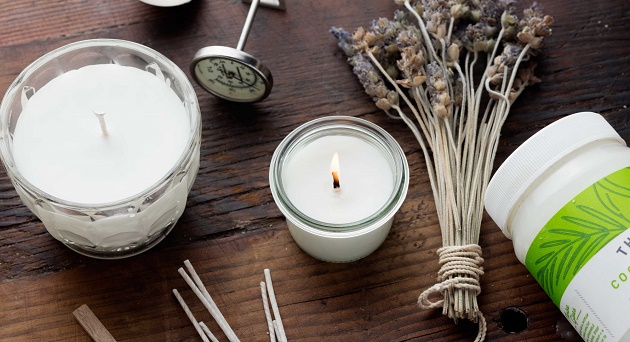
A great way to make a room more comfortable is by lighting up some candles, especially scented ones. It gives warmth and an intimate glow while keeping the room smelling fresh and wonderful that’s perfect for setting up a mood. Making your own candles will give you the option of personalizing it to your preference and it’s even quite enjoyable to make.
Supplies:
• Glass Container
• Heatproof Bowl
• Pot or Saucepan
• Chopsticks or Clothespin
• Tape
*Note: The glass container will serve as the container for your candle so make sure it won’t break when exposed to heat or flame. Mason jars and other thick glass containers are some options for candle-making.
Materials:
• Soy flakes
• Candle wicks
• Essential Oils (of your preferred scent/s)
• Non-toxic Crayon (optional)
*Note: The amount of materials you need greatly depends on the glass container you use and the amount of candles you end up with.
Procedures:
1. Measure the soy flakes.
The amount of soy flakes you need depends on your glass container. You’ll need twice the amount of soy flakes to fill up the container you have. For now, place your measured soy flakes in the heatproof bowl.
2. Setup the wicks.
There are pre-waxed candle wicks available which you can easily adhere to the bottom center on the inside of your glass container. If the wicks you have are not pre-waxed, simply melt some candle wax on the bottom of the metal ends of the wick and stick it on your glass container. Alternatively, if you don’t have any spare candles, you can wait until later on once your soy flakes have been melted before setting up your wicks. Simply dip the metal end of the wick in the liquefied soy flake before adhering it to your glass container. The wax serves as the glue to secure the wick in place.
Once your wicks have been secured, keep the thread upright by holding it between two chopsticks or between the clamps of a clothespin. Let the chopsticks or clothespin rest on the mouth of your glass container and secure the ends of the chopsticks or clothespin by taping it on the container.
3. Melt the soy flakes.
Fill the pot or saucepan halfway with water then fit the heatproof bowl with the soy flakes on top of it. Make sure that the bottom of the bowl doesn’t touch the surface of the water in the pot. If it does, remove some water until there’s some space between the two.
Remove the soy flakes from the bowl for a while as you turn on the heat. Bring the water to a boil then reduce the heat until the water simmers. Only then should you add the soy flakes to the bowl. Stir the flakes occasionally until it melts.
4. (optional) Add some colour.
The candle will end up being milky white in colour but if you want to give your candle some other colour, cut off a tiny bit from the crayon and melt it with the soy flakes. A small amount goes a long way so add a little at a time if you want the colour to be brighter. Know that even if the mixture looks bright when melted, it turns milky as it cools.
5. Add scent.
Remove the melted wax from the heat. Measure or estimate the amount of melted wax you have. You should add about 10 drops of your preferred essential oil per 2 cups of melted wax. Add more if you want a stronger scent or mix and match scents together. Stir the mixture to distribute the essential oil well.
6. Transfer the mixture.
Make sure your melted wax is in a container that’s easy enough to lift and pour into another container without making much mess like a measuring cup. Carefully pour the mixture into the glass containers with the setup wick, making sure not to disturb the position of the wick. Allow your candle to completely cool and solidify before using.