


It’s virtually impossible to run out of things to do with paper plates. With enough imagination as well as the right tools and materials, you can come up with an array of fun, functional and educational things out of these disposable party staples.
Continue reading to help get your creative juices flowing. Below you can find 10 of the things you can do with paper plates instead of throwing them away and contributing further to the planet’s heartbreaking pollution status.
Flash Cards
Regardless if you want to teach your kids the alphabet or you are trying to learn a new language, turning paper plates into flash cards can make the learning process more effective. Because paper plates are simply too big to be used as typical flash cards, grab your scissors and cut them into halves, squares, rectangles — just about any shape you can think of will do. Use markers or paints of different colors because learning something new is easier if it’s fun.
A Purse
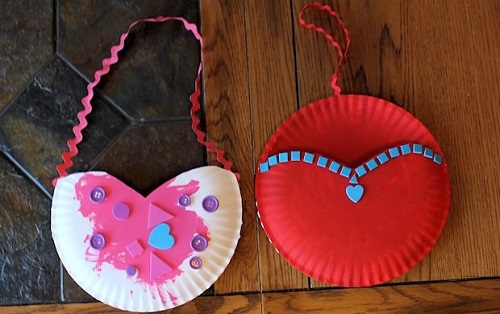
Allow your daughter’s creativity to spring into action by helping her whip up a lovely purse out of paper plates. To get started with this project, grab a paper plate and cut it in half. Paint and embellish the bottom parts with glitter, rhinestones, beads, sequins, buttons, etc. Afterwards, glue the edges together and let dry completely. Poke a hole on each side. String a ribbon through them and tie.
Dish Protectors
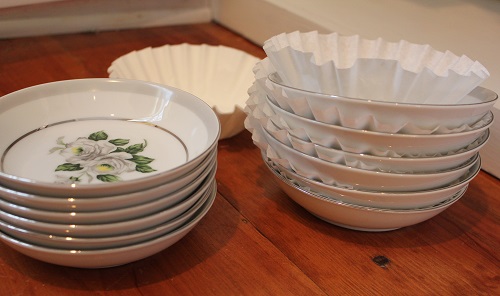
When storing your dishes, it’s a wonderful idea to place a paper plate in between them to keep them from clanging and breaking. Paper plates can save your precious dishes from harm when you’re moving from one house to the other.
Musical Instruments
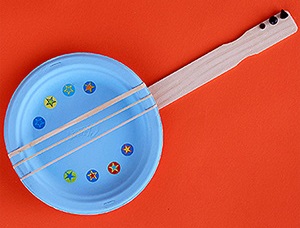
There are a couple of musical instruments for kids that you can make with a pair of paper plates. Create a maraca by placing a handful of rice or tiny seeds on one paper plate, then gluing another one on top of it. Once completely dry, it’s time to have the maraca decorated. Make a tambourine by gluing together two paper plates. Once dry, grab a puncher and create 5 to 6 holes around the edges of the glued paper plates. Secure a tiny bell on each hole with a ribbon. Decorate the tambourine paper plate and fill the air with music!
Mail Organizer

For this very simple project, you only need a couple of paper plates. Grab one and cut it in half. Glue one half on the other paper plate to form a pocket. Decorate according to your desire and mount on the wall.
A Dream Catcher

Get a pair of scissors and cut out the middle circle of a paper plate. Use a puncher to put holes along the edges of the paper plate and weave a long piece of string through them. Remember to occasionally add wooden or glass beads. Once done with the weaving part, embellish the rim with feathers or just about any other decorative element that can make your paper plate dream catcher really appealing and one of a kind.
Paint Drip Guard
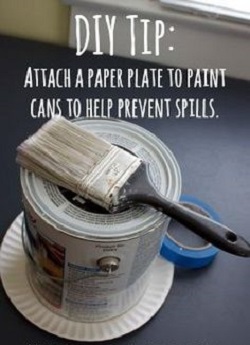
When giving your kitchen wall or any other wall in your home a fresh coat of paint, place paper plates under paint cans to save the floor from drips. At the end of the DIY project, your walls will look fantastic and your floors paint-free.
Stencils
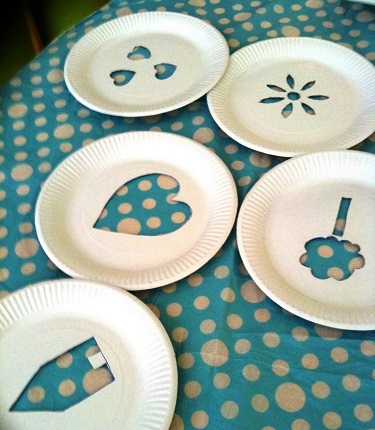
Still on the subject of home remodeling, it can be fun to add eye-catching patterns on your walls for some drama and interest. Use paper plates to come up with cheap stencils that can make your walls look out of the ordinary. Whether you wish to opt for floral or geometric shapes, allow paper plates to help you carry out such intricate stenciling job.
Ring Toss
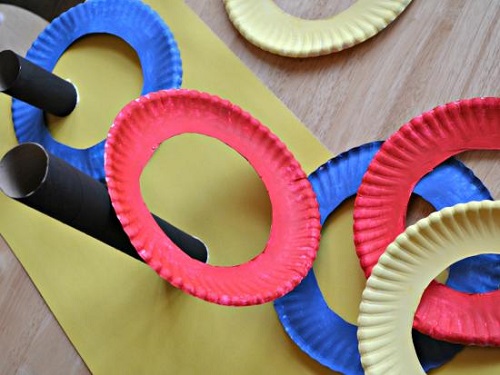
Create rings by cutting out the center of some paper plates. Grab your paint brush and give each ring a coat of vibrantly colored paint. For this project, you also need a long cardboard tube from your cling wrap, aluminum foil or kitchen towel. Cut slits on one end of the cardboard tube, flatten the flaps created, and tape onto a paper plate.
A Clock

For this educational toy, you need a couple of paper plates. Use one of the paper plates to cut out the minute and hour hands of the clock. On the other paper plate, write down the numbers using a glitter pen, marker or paint. Punch a hole in the middle or the paper plate and attach the two hands with a paper fastener.
If there are other exciting paper plate projects you can think of, do the planet a huge favor and share them here!